
Publié le
How to build a chicken coop
With urban chicken farming on the rise, we want to share some DIY chicken coop tips.
For many, the pandemic sparked a desire to get back to nature. Even before the lockdown, we were seeing a steady increase in homestead living trends. Whatever the reason, urban chicken farming is more popular than ever. And if your family’s been thinking about getting into this sustainable-living practice, we’re here to share some tips on how to build a chicken coop that will last season after season.
Does your city allow urban chicken farming?
Before showing you how to build a simple chicken coop, we should note that not all cities permit urban chicken farming. Much like shed building permits, rules and bylaws concerning urban chicken farming vary from one municipality to another. Just be sure to call your city or check their website before investing in an urban chicken coop.
How to build a chicken coop: what to consider
When selecting your plan or prefab chicken coop, you’re going to have to account for environmental factors, predators, accessibility, and more. Here are some of your main considerations:
How to select a location for your chicken coop: Ideally, you’ll want to avoid building at the bottom of a slope to prevent water buildup. Chickens also need shade, so if you have a lush tree in your garden, take advantage of it!
How to build a predator-proof chicken coop: You should also consider potential predators, so opt for a space that’s close to your domicile and avoid erecting the chicken coop near foliage where animals can hideout. Additionally, having your chicken coop elevated is a crucial deterrent.
How to determine your chicken coop size: Your chicken coop size depends on the number of birds you have. Some municipalities even have a minimum square footage per bird, so be sure to check the rules before picking up your hammer. Most commonly, 3 feet per bird is recommended for inside the coop, and 5 feet per bird is recommended for the run.
How to build a chicken coop for winter: Chances are, you’re reading this in Quebec, so there’s no need for us to underscore how brutal our winters can get. If you want your chickens to survive the frost, you should consider insulating your chicken coop. It’s also essential to check for gaps every season, add extra shavings to the floor, and ensure your nesting boxes are made of wood and not metal or plastic.
How to build a chicken coop in 7 steps
A quick note on materials—unlike a garden shed, a chicken coop houses living creatures and therefore must be constructed with non-toxic, non-corrosive materials.
Also, what follows are instructions for just one basic type of chicken coop. If you want to learn how to build a walk-in chicken coop or some other variation, countless plans are available online with precise measurements. Additionally, you can always opt for a prefab chicken coop from a trusted supplier to save time and money.
Step 1: How to build a chicken coop frame
Cut your side and vertical battens according to your plans. Begin by assembling the side battens with screws. To know if the structures are straight, measure the frames’ diagonals, ensuring the lengths match.
Next, you’ll fix the four connecting battens on the inside of each joint, and finally, you’ll repeat the process with the lower lumber battens, which are generally positioned 19.5″ from the ground.
Step 2: How to build a chicken coop roof
The roof trusses should be connected at 45-degree angles. You’ll need to make three of equal length. Once they’re assembled, screw them to the top of the frame so that they’re aligned with your vertical battens. Next, it’s just a matter of fixing two ridge rails to the trusses.
Step 3: Panelling your chicken coop
Now that your chicken coop skeleton is complete, it’s time to seal it up. Use two OSB boards (measured accordingly) to cover up your roof. When fixing the panels to your trusses and battens, space the screws by 12″.
As for the frame, you’ll need to cut 2 side panels, a 1-floor panel, 1 gable panel, 1 coop entrance panel, and 1 front roof panel.
Your side panels, entrance panel, and floor panel should be measured to fit the gaps surrounding the top half of your frame and the lower lumber battens.
Begin by fitting the side panels then the floor. Next, you’ll add the gable panel and the coop entrance panel. Save the front roof panel for last.
Step 4: Cutting your openings
With your panels in place, it’s now time to measure and cut your openings and access.
- For the chickens: Cut your coop entrance centred at the bottom of the panel (approx. 18″ h x 14″ w)
- For ventilation: Cut your gable panel toward the ridge (8″ h x 8″ w)
- For cleaning access: cut a right-side access hole in the center of the panel (approx. 14″ h x 24″ w)
And be sure not to dispose of your OSB cut-outs—you’ll need them later. Finally, sand the edges to remove any splinters.
Step 5: Assembling the doors
We’ll start with the coop doors.
The 2 door frames should be measured to fit the gap below the front roof panel. Assemble them using battens that fit the full interior length of the frame and half the interior width. Once the battens are assembled, install them with hinges.
Next is the entrance door for the chickens. This bit is easy. All you have to do is attach the piece of OSB board cut out from the coop entrance by a top hinge.
Repeat the same process for your access doors—only this time, divide the OSB cut-out in half and attach each side with a hinge. Add handles and a latch for it to open and close with ease.
Also, don’t forget your coop ramp! This can be assembled using a leftover piece of OSB with wood strips or even branches as steps.
Step 6: Completing the exterior
Now that everything is in place, you’ll want to remove your panels and paint them. After the structure is reassembled, add your chicken wire. Lastly, felt and shingle your roof.
Step 7: The final touches
Congratulations—your chicken coop is complete! The only bit left is to accessorize your interior with nesting boxes, a watering device and feeder (which can easily be purchased online), and roosting bar. The latter can easily be installed using 1.5″ dowels in the upper part of the coop. Allow for 8″ per chicken.
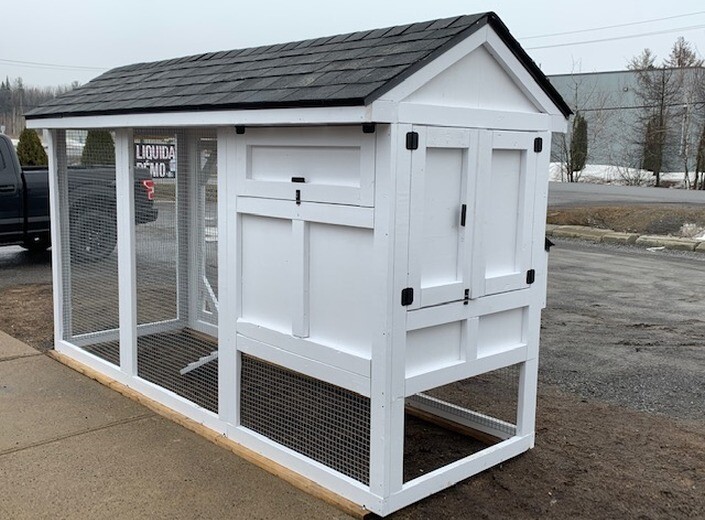
Prefab chicken coops: How to build a chicken coop in a way that saves time and money
Of course, if you don’t have the costly power tool or hours in a week to labour over a DIY chicken coop, you can always take the prefab route! At Cabanons Mirabel, our prebuilt chicken coops are made in spruce to accommodate the winter season. And at 256 cubic feet, the design lets you accommodate up to 5 hens. They’re affordable, easy to clean, and are available in a wide variety of colours. To learn more, speak to our experts today!